Managing agent context - Part 1: Understanding the context window
One of the most important skills to develop if you want to use agents effectively is learning how to manage their context. This is also referred to as context engineering: deciding what information the agent can see and what should stay out.
Before we can manage context well, it helps to understand what is actually inside an agent’s context window. Anthropic defines context as “the set of tokens included when sampling from a large language model (LLM)” in their article on Effective context engineering for AI agents. In practice, I find it easier to think of context as everything the agent can currently “see”: instructions, tools, memory, files, previous messages, and any other state that has been loaded into the session. The model will then use this information to shape its response.
What goes into a context window
Let’s look at what goes into an agent’s context in one Claude Code session.
In Claude Code, I can inspect what is in my current context window by typing the command /context. Below is a screenshot that I took in the middle of a session with Claude Code.
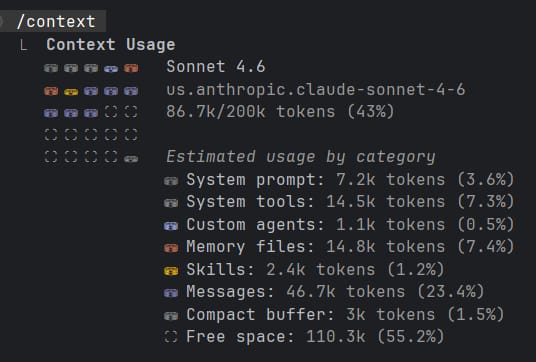
In this session, Claude Code shows 86.7k tokens used out of a 200k-token context window, or about 43% utilization. It then breaks those 86.7k tokens into categories. Let’s look at each category.
System prompt
These are top-level instructions loaded by the product or client before your actual task. They can define the agent’s behavior, tool-use rules, safety boundaries, and response style. In Claude Code, the CLI exposes flags for either replacing the default system prompt or appending additional instructions to it (see Claude CLI reference):
claude --system-prompt "your new instructions"claude --system-prompt-file ./custom-prompt.txtclaude --append-system-promptclaude --append-system-prompt-file
For Codex, a model_instructions_file can be provided in the ~/.codex/config.toml file to replace the built-in instructions (see Advanced Configuration).
We can also look at the current system prompts of these two tools. These instructions can change over time, so I would treat any snapshot as version-specific. Still, reading through them is a useful way to understand how the products aim to shape agent behavior. Anthropic provides their system prompts here: System Prompts. Codex’s base instructions can be inspected on OpenAI’s GitHub.
System tools
Tools let an agent take specific actions, such as reading files, running shell commands, searching the web, or editing code. They are similar to functions or APIs that the model can choose to call during a task. System tools are the built-in actions the product exposes to the model. In Claude Code, examples include:
- Bash: execute shell commands,
- Glob: find files based on pattern matching,
- Grep: search file content,
- Read: read file content,
- Skill: execute a skill,
- WebSearch: perform web search,
- Write: create or overwrite files.
The full list of Claude Code tools can be found in Anthropic’s Tools reference.
Similar to skills, tools come with descriptions that tell the model what each tool is for and when it should be used. Those descriptions are loaded into context along with the system prompt, which means every available tool adds some instruction overhead before the actual work begins.
Custom agents
You can create custom subagents that Claude Code can invoke automatically to perform specific tasks. This works similarly to Skills: you write a short description with the trigger for when it is to be used. Project-specific custom agents can be saved as Markdown files in the .claude/agents/ folder, while user-level agents that should be available across projects can live under ~/.claude/agents/. Upon startup, Claude will load all the available agents’ descriptions into its context window so that it knows when to use each of these subagents.
Claude has some built-in subagents:
- Explore: A fast and read-only agent optimized for searching and analyzing codebases,
- Plan: A research agent used during Plan mode to gather context for the plan,
- General-purpose: A versatile agent for complex and multi-step tasks that require both exploration and action.
More information can be found in the official Claude Code docs Create custom subagents.
Memory files
This category includes two mechanisms:
CLAUDE.mdfiles: instructions you give to Claude to be considered in every session. You can have multipleCLAUDE.mdfiles in memory at the same time. For example, you can have one CLAUDE.md file managed by your organization’s IT department, one global file for all projects, one repository-level file, and then another one for a specific project within that repository. Claude will load all of these files into memory.- Auto memory: Claude can automatically record learnings that it judges as useful for the future. This can be build commands, debugging insights, architecture notes, code style preferences, workflow habits and other points. This can be toggled on or off within a session or disabled in the project settings.
Memory is saved into Markdown files in ~/.claude/projects/<project>/memory/. You can have a high-level MEMORY.md file here with some general rules you want Claude to follow. This MEMORY.md file can then also be used as an index file to link to other memory files in the same folder. For example, you can have a gotchas.md or an architecture.md with more details about these specific points.
In my own projects, I split these preferences into multiple files under .claude/rules/ and reference the relevant ones from CLAUDE.md.
code_style.md: for my coding style preferences,custom_libraries_overview.md: explanations for custom libraries I have created so Claude is aware of their existence and what they do,development_workflow.md: general notes on the steps of my development workflows, e.g. existing pre-commit hooks, linters, static type checkers, which directories to work in, and similar setup details.documentation_workflow.md: how to create project documentation, e.g. what goes into a project’sREADME.mdand how to structure it, how to improve existing documentation to incorporate learnings,git_workflow.md: branching strategy, commit message format, commit contents and timing,pipeline_rules.md: specific rules for data pipelines,review_config.md: rules for how to do code reviews,testing_rules.md: how to do unit, integration, and E2E tests.
You can read more about this topic at CLAUDE.md vs auto memory.
Skills
Skills usually expose a short description up front, so the agent can decide when a skill is relevant. If it uses that skill, the more detailed instructions and supporting files can then be loaded into the session. This makes them very token-efficient. I will write about skills in more detail in a future article.
Messages
These are all the messages sent by the user as well as all the responses sent by the model. This category can also include model-side reasoning or thinking tokens, depending on how the product exposes and accounts for them. In Claude, the effort setting controls how much thinking the model applies to a response. Higher effort can improve depth, but it takes longer and uses more tokens; extended thinking is a separate setting (see also Change the model, effort, and thinking settings). In most cases, messages will use the most tokens in a conversation.
Compact buffer
When auto-compaction is enabled (which is the default), Claude can compact the conversation once the context window passes a configured threshold. This means that Claude will create a summary of the conversation and keep only that summary as message context while clearing the remaining past messages. The compact buffer reserves a configurable amount of tokens in each session to allow the compaction operation to be executed more reliably. When performing the compaction, Claude will reason about which parts of the conversation to include in the summary, so this operation itself will also consume tokens. I will cover compaction in more detail in part 2.
Note that in my workflow I have disabled auto-compaction, so the buffer is only minimal. You will find my reasoning about that also in the part further below.
Codex CLI
This is a useful contrast with Claude Code: Codex exposes the overall usage number via the /status command, but not the same category-by-category breakdown.

This does not give the same breakdown as Claude Code. I tried to get around this by prompting Codex to show me a similar output to Claude’s /context command.
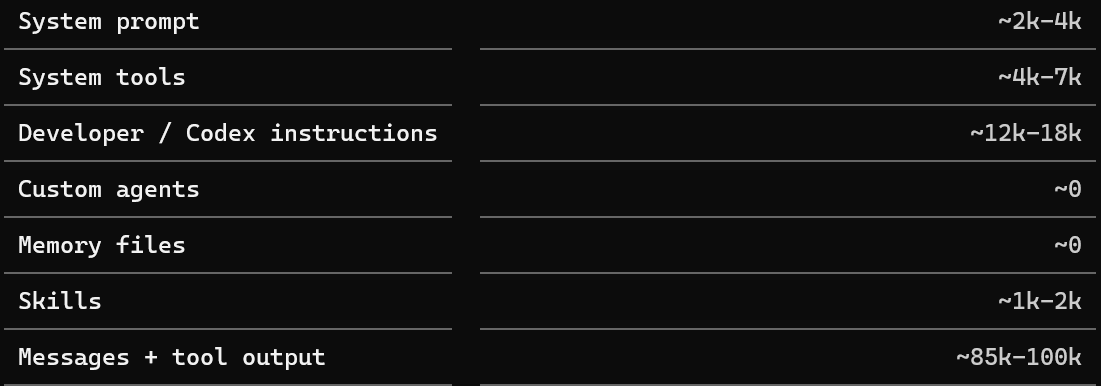
Because this breakdown is inferred by the model rather than reported by the CLI, I would treat it as illustrative rather than diagnostic.
Conclusion
In part 1 of this series, we looked at what goes into an agent’s context window using Claude Code as the main example. Other agent tools may use different names for these pieces, but the basic idea transfers: the agent’s context is not just the visible chat history. It also contains product instructions, tool descriptions, memory files, subagent descriptions, and other state loaded into the session. All of these pieces compete for the same limited space. The more you understand what is being loaded, the easier it becomes to reason about why an agent behaves a certain way, why it may forget earlier details, and what you can do to keep future sessions focused.
In part 2, we will look more closely at what happens when the context window fills up, including compaction and other ways to keep working on the same topic without losing the important parts of the conversation.